
 This is one of the most critical sections in restoring and maintaining a Super Alce so pay attention!! For most of this section I have collected a series of emails posted to the Guzzi Singles group over the past few years all asking and answering similar questions. Hopefully having it in one place helps riders and restorers. I
  am indebted to Patrick Hayes' detailed write-up on how to cure wet-sumping and for the photos.
Oil Grade:
There is no SAE oil grade specified but being based in relatively cool Massachusetts where early morning rides even in summer can be quite cool (40deg F to 60deg F), I use a 5w-30w oil Mobil 1 though a straight 40w would cover the range. For temperatures between 70deg F and 100deg F use 50w oil. If anyone rides in the winter (0deg F to 50deg F), 5w-30w or a straight 20w should be OK.
The SAs have ball and roller bearings throughout and not shell bearings like modern engines. The only plain bronze bearings are on the valve rockers, on the ends of the shifting drum, on the cam follower rollers, and a sleeve bearing in the camshaft. All these and the ball and roller bearings run well with single weight oils. I use Mobil 1 as my local warehouse retailer stocks it.
Oil Capacity
The oil capacity is 2.5litres and the manual gives the circulation at 60litres per hour, thought what one can do with that figure is beyond me! Another check is that the top of the oil in the central oil tank should be around 4" below the top thread in the tank.
Oil Tank
The oil tank itself gets full of sludge after a while. The cure, obviously, is to wash it out with paint thinner and clean the oil filter. Failure to do this could cause oil starvation. [In America, paint thinner is also known as mineral spirits. It is a good solvent, but not particularly volatile or harsh to painted surfaces. In Europe however, the term 'paint thinner' refers to something Americans call lacquer thinner. This latter material is highly flammable and an instant paint remover and should NOT be used for this cleaning purpose. In a pinch, you can use gasoline. But please no ciggies while cleaning]. The other cause of oil starvation is a clogged sludge trap in the crankshaft. No alternative to splitting the cases and removing the screws to clean it out (see the crankshaft section)
Leaking Oil Tanks
All the bosses as well as the end plates and all seams on Guzzi singles tanks are soft soldered together. Once soft solder gets on, you can't really get it all off. Brazing or silver soldering the tank will get the sheet metal so hot that you will have a problem with warpage. Advice is not to do it.
Jerry Kimberlin's recommendation is that the best you can do is to get as much of the solder off as you can mechanically and with a soldering iron. Then you can bead blast the outside area (but not the inside, of course). It is important to bead blast the brass fitting to clean it. Then flux the brass and the steel and resolder. It is important to remove all of the oil and that is very, very difficult to do. Yes, it will crack again and again but that is the best you can do.
It helps to have the connecting tubes, banjos fit as flat to the tank as possible so that there is a minimum of flexing at the fitting.
Oil Pipes, Threads and Compression Fittings
To keep the system oil tight all compression fittings need to be tight and the threads in good condition. After a while the brass pipes get dinged and bent. Stucchi has new ones or you can make your own. Jerry Kimberlin says that the flares / tube ends on the pipes are separate ends and can be made on a lathe out of bronze or brass and silver soldered on.
You can buy the whole fitting as a metric compression fitting. You might have to make a longer pipe too which leads to getting another banjo for the other end. The banjos are available as well from: http://www.metricmcc.com/
If the basic fitting and compression nut is OK it is easier to turn up another ferrule on a lathe and just solder it on. If you need a little extra length, just make the ferrule a little longer. Cheaper too.
The rubber hose between the oil tank and the pump overlaps the brass tubes about two inches on either side and are clamped with hose clamps to keep it oil tight. I coated the threads with RectorSeal No.5 which I bought from Home Depot and use for all kinds of threads (including gas tanks without any problem). Others have used Permatex Hylomar.
Oil Tap
The early Super Alces had a manually operated tap between the oil tank and the oil pump. The later Super Alces have an automatic oil-shut off valve that looks like a little poppet valve inside the oil pump. When the pump spins, this valve is fully open. When the engine stops, the valve automatically shuts oil flow off and prevents gravity letting the oil drain through the tolerances in the oil pump gears into the crankcase. This is the theory: reality is far different. Oil always seems to flow past the automatic valve and if the bike is not run for a while, it puddles in the crankcase and wet sumping occurs.
The bike was intended for daily use and the amount of wet-sumping was tolerable as long as there was immediate use to scavenge up any leaked oil. Today, the bike might sit in a collectors garage for many weeks or months without operation. The next time it is started up there is a huge cloud of smoke!
The best solution is an inline manual valve to stop gravity letting oil drain out. Most riders of these later SAs fit an in-line tap in the oil line between the oil tank and the pump and have various figurative strings tied around their fingers to remind them to turn this manual tap on before firing up the engine. An SA can go around two or so miles without oil before it starts to tighten up. One creative Italian solution has a ground wire attached to this valve. When the valve was closed, the ignition points were shorted and the engine would not fire. A clever aftermarket solution.
My bike had a manual tap but the conical taper of the valve in this tap had too large a clearance and oil kept seeping past. Jerry Kimberlin's remedy was to lap this conical valve in its seat with TimeSavers. Against Jerry's express warnings because it would imbed in the brass, I used Clovers Fine paste. I fitted a new spring on the valve to press the valve against its seat and it seated fine. Good whitening toothpaste will work but will take longer.
However, it still had a slow leak so I fitted a Home Depot tap just below the SA tap. Specifically, I used a UPC ball type valve with a 1/4" hose barb (Watts A-192) and that did the trick.
Circulation Path
First, oil is not just simply fed by gravity to the oil pump from the tank. Once fully primed there is a mild negative pressure in the system which makes it critical to ensure all threaded fittings and compression joints are airtight.
Oil flows from the tank into a dual pump bolted on to the outside of the timing side case. Most of the later Guzzi-Singles have an automatic valve within the oil pump that looks like a tiny cylinder head inlet valve. The angled face of this valve and its relative seat can be polished and lapped to provide for a better seal.On one engine, the valve was being held open by a tiny piece of debris. I cleaned and inspected this valve, the passages, and the valves contact face. CAUTION: DO NOT EVER mess with the tension quality of the tiny internal spring for this valve. Too weak and it can't oppose gravity flow. Too strong and it might prevent oil feed to your motor.We don't know of a published spec for this spring or if a replacement spring is available independently. When in doubt, replace the entire valve structure.
The oil pump has two sections stacked internally. There is a displacement gear pair which provides slightly pressurized squirts of oil to the connecting rod bearings via a hole in the RH mainshaft. Centrifugal force flings oil that comes through the con rod needle bearings onto the cylinder/piston surface and onto the transmission. Oil then drops into a cavity at the bottom of the crankcase and passes through a wire mesh. The second vane pump then collects the scavenged oil from the sump and returns it to the tank. There is a tube that goes up to the valve gear that drains oil back to the sump from the cylinder hear. Some engines have a specific valve gear lube tube. There is a small passage at the top of the crankcase which allows for oil mist to pass from the crankcase to the clutch chamber. Finally, there is a breather pipe from the clutch chamber to the rear end of the oil tank. Look into the oil tank and you might be able to see two standpipes. One from the sump and one from the breather. The breather is open and points straight up. The scavenge return is hooked and pointed back down toward the oil bath. At low engine speeds it will probably be bubbling and frothing more than "flowing". The scavenge pump is efficient and starts pulling air as soon as it has pulled all of the oil. Higher speeds will produce more of a pure oil flow. A few minutes after starting up the engine you should see oil squirting up via the upright pipe inside the oil tank as it returns from the pump to the tank.
The picture at right from Patrick Hayes shows the breather tube at the rear that goes back to the oil tank, the middle screw which actually covers a small steel ball that acts like a c
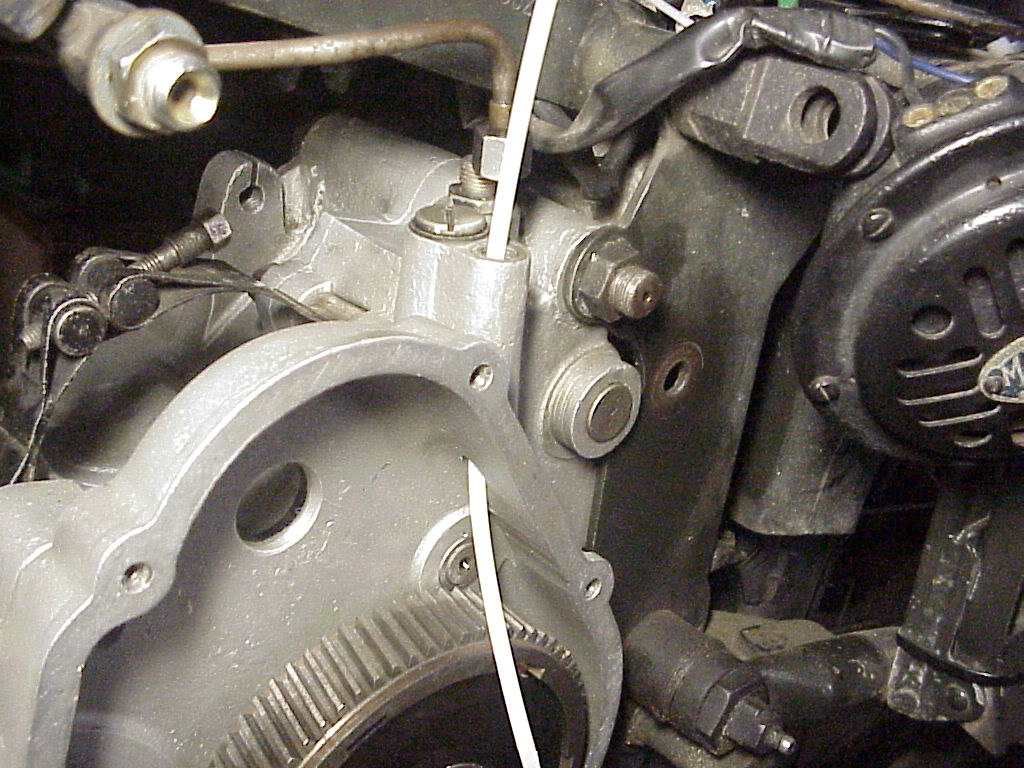 heck valve pressurized by crankcase pressure fluctuations (when the piston rises, it creates a negative pressure in the crankcase and gearbox helping the oil pump suck oil from the tank; when the piston descends, it bleeds the positive pressure easing the pressure on the felt seals), and the front passage (with the zip tie put in to show the through passage) that is used to clean the clutch plates (see below).
This mist of oil lubricates all the parts in the clutch chamber, including the plates, and eventually condenses into a puddle in the clutch chamber. It is a total loss system. There is no way for this oil to get back into the engine case. Eventually, this condensed puddle grows to the level that the bottom of the clutch parts are sitting in a pool of oil and any further excess starts to leak out behind the flywheel where the crankshaft passes through the clutch chamber. There is no seal for this passage.
The blue tape in this photo from Patrick Hayes shows the maximum depth of oil puddle within the clutch chamber before it will simply pour out the crankshaft hole.

Guzzi didn't want to waste this oil mist, so there is a passage which goes from the middle to the rear of clutch bell, across the gearbox to the right side just near the chain sprocket. Some of the oil mist works its way out over here and drips onto the chain as an automatic oiler. Clever, but messy. Many riders plug that cross passage to reduce the mess and rely on modern chain sprays. With that we are done with the oil circuit.
Oil Pump
 The picture on the right shows the various parts of the oil pump. At the top of the photo is the oil shut off valve. The valve body is actually assembled from the right by inserting into the threaded body after which the oil inlet tube on the right is screwed on. Once inserted, the spring is slid on from the left onto the stem of the valve and retained with the thin plate washer and cotter pin that goes into a tiny hole in the valve stem. The cover on the left is then screwed on.
In the bottom row, the cover plate with four screws is on the left followed by the driving gear that meshes with the pinion gears driven off the RH side of the crankshaft. The tiny gear above the larger gear sits in the circular cavity and is driven by the splines on the shaft to the right of the pump body. The slots in the shaft retain the spring loaded vanes that scavenge the oil fr
 om the bottom of the gearbox via a short 90 deg bend return oil tube at the rear of the pump to the long oil return tube in the front of the pump that goes to the bottom of the oil tank in the top tube of the main frame.
The photo on the right shows the inlet side of the pump with the large gear sitting just before its tapered seat and the splines on the shaft meshing with the oil inlet gear. This conical fit needs to be good - Loctite 609 bearing compound fit works well. The gear retaining nut is coated with blue thread locker.
Dimensions of the oil pump
These are difficult to measure accurately and rarely is there wear. However, here they are:
Bore for the splined shaft=9.5x7mm+0,-0.015mm Replace if tolerance is greater than 0.08mm.
Blind hole for the support of pump idler gear shaft=7mm+0.04,-0mm, max wear is 0.08mm
Inside the pump body, the recesses for the two gears should be 14.8mm,+0,-0.027mm,max wear is 0.08mm. On the other side the tolerances for the circular opening for the splined shaft should be the same as that shown below for the shaft itself. Max wear is 0.08mm
Splined shaft shank between splines and slotted head=14mm+0,-0.027mm
Dia of slots across head of splined shaft=18mm+0,-0.018mm
Dia across large bore=20.44mm+0,-0.04mm. This is an eccentric bore and difficult to measure. Assemble the gear and tighten everything. Just before putting on the external plug measure the clearance between the bottom of the slot in the head of the splined shaft and the bottom of the pump bore. Nothing thicker than a 0.03mm feeler gauge should fit.
Before assembling the pump, test it as follows: connect the bottom (inlet) and rear (sump return) oil tubes to the pump with the other ends of these pipes in a jar of oil. Looking at the drive gear, rotate it counter-clockwise. You should see oil dripping out of the scavenge thread fitting in front and from the side spray injection tube.
Now comes the most critical part: after I assembled the pump on the engine, screwed on the external plug with the teflon washer and ran the engine, all the oil ended up in the sump. After much head scratching, Patrick Hayes reported a similar experience with his Falcone where after replacing the washer with a too thick washer, all the oil just flowed into the sump. I removed the teflon washer and tightened the plug all the way down. The clearance between the inside lip of the plug and the seating face was 0.70mm measured with a feeler gauge. My washer was 1.80mm thick. I coated the last few threads of the plug with Red gasket sealant and put a generous amount all round the 0.70mm gap and started up the engine. Problem solved - oil returned back into the tank from the return pipe. Nowhere in the manual is the thickness of this washer specified but it obviously is extremely critical!
Every now and then I still nervously open the oil tank cover and peer inside to make sure that oil is returning from the scavenge tube!
Dirty Clutch Plates
[This section from Patrick Hayes]. Warm, thin, clean oil is a very nice substance to put onto the clutch plates. It lubricates everything for smooth action and minimizes wear. However, cold, dirty oil acts more like a glue than a lubricant and prevents free action of the plates. The various clutch pieces all bind together and fail to slip as intended. It can become very noisy to shift gears, especially down into first gear. The noise also produces damage to the tips of the gear teeth. The COMPLETE CURE is to fully disassemble the entire clutch package and clean all the parts to new condition.
The INTERMEDIATE MAINTENANCE solution is the BATHE the clutch parts to remove any oil or dirt or wear material and restore original action.
First, at the lower rear curve of the clutch cover just under the flywheel, there will be a small, slotted screw-plug. Remove that to drain away all of the condensed puddle of oil. I bent some aluminum into a channel which I stuck under this screw and rested on the exhaust pipe. The other end of this channel drained into a container. Otherwise, all the oil ends up on the curved exhaust pipe!
Second, at the top of the left side crankcase, unscrew the front slotted plug (the one with the zip tie in the photo) which leads directly to the clutch chamber below.
Third, pour a pint of 'paint thinner' into the clutch chamber via the upper plug. If you put too much, it will simply run out the opening behind the flywheel. CAUTION: In America, paint thinner is also known as mineral spirits. It is a good solvent, but not particularly volatile
or harsh to painted surfaces. In Europe however, the term 'paint thinner' refers to something Americans call lacquer thinner. This latter material is highly flammable and an instant paint remover and should NOT be used for this cleaning purpose. In a pinch, you can use gasoline. But please don't smoke while working.
Fourth, pull in the clutch lever and kick the kickstart lever around 20 or so times. The kickstarter will be rotating the inner body and steel plates, while engine compression will be holding back the external body and bronze plates. The paint thinner will remove oil, grime, and wear contaminants from the clutch parts and drop them into the bottom of the clutch chamber cover. Do this kicking and feathering for several minutes.
Fifth, remove the plug at the rear lower corner of the clutch cover just behind the flywheel and drain away the contaminated paint thinner. None of this stuff will hurt the clutch plates.
The proper way to do this is to take off the flywheel, and clean the clutch manually, then put it back together with a few drops of ATF on each side of each plate. The washout is a good stop-gap measure when you are out on the road and encounter a slipping or grabbing clutch, but isn't a good substitute for a proper cleaning.
The left side engine cover has TWO drain holes. The first is the lower rear corner of the cover behind the flywheel and it has a threaded screw plug that we unscrew to drain the spirits used to clean the clutch. The second hole is much smaller diameter, perhaps 2mm, and is just below the center of the flywheel. Here's Patrick's theory: "Guzzi wants a small puddle of oil to collect under this left side engine cover. The clutch gear will ride in the oil and pick it up as a tooth lubricant. When the puddle gets too big, it begins to dribble out the flywheel hole. The left side cover has a chamber to catch this flywheel ooze and drain it directly downward through the small hole. Its not written anywhere, but when you see oil draining from this flywheel center bleed hole, then its time to pull the plug and drain the entire chamber and do a mineral spirits bath of the clutch bits."
Thank you so much for the post you do. I like your post and all you share with us is up to date and quite informative, i would like to bookmark the page so i can come here again to read you, as you have done a wonderful job.
ReplyDeleteRobinets de Baignoire
Cool stuff you have and you keep overhaul every one of us Directional drilling has been an integral part of the oil and gas industry. Tools utilized in achieving directional drills include whipstocks, bottom hole assembly (BHA) configurations, three-dimensional measuring devices, mud motors, and specialized drill bits. We will help you get the best quote for directional drilling tools and directional drilling services. Here is the list of directional drilling compaines with an excellent track record for best results. list of directional drilling companies
ReplyDeleteThank you for the comprehensive and informative post on "Oil Pump and Lubrication." The detailed exploration into how oil pumps operate within lubrication systems provides crucial insights into their importance for the longevity and efficiency of mechanical systems.
ReplyDeleteTo discuss your specific requirements and find the perfect force feed lubrication pump Solution for your needs, contact us today at +91 8200534479 or visit us On Zenith Hydromatic .