Saturday, March 6, 2010

Valve Timing and Pushrods


(see Engine-Crankshaft and Flywheel for parts diagram)

Pushrods


Both my inlet and exhaust pushrods (and rockers) had serious problems: a pushrod was slightly bent, both had ball ends that had been brazed on and were now worn, and the rocker cups in the cam followers and the rockers themselves were chipped as a result of becoming brittle from work-hardening. Since I was going to replace both pushrods I did not bother labeling them to keep them separate.

Stucchi provided the 4 rocker cups and 2 ball ends for the rockers and rods. The cups for the cam followers inside the timing case are the same cup diameter as the cups in the rockers though they have different part numbers. I ordered 10mm OD/8mm ID (1mm thickness) hydraulic tubing from http://www.metricmcc.com/ with a length of around 285mm over the ball ends. The pushrod ends are 8mm OD and I loctited the ball ends into the tubes and the cups into the rockers with Loctite 660. The ball ends themselves are 7mm that fit in cups that are 7.20mm dia and 5mm deep.

Cams

Other than making sure the oil holes in the cam faces were clear there was nothing much to do. The inlet and exhaust cams are one unit and are integral to the cam gear. There was no scoring or pitting.

Pivot and Cam followers


The pivot has a step that in the parts diagram goes into the crankcase; however, on my engine, assembling it this way prevented the cam followers from fitting. When I reversed it (the shorter step portion going into the timing side cover), it fit fine. I am not sure if the parts diagram has this part reversed or if my engine is different which would not surprise me!

The bushes inside the cam followers were within the specs. If new bushes need to be installed they need to be reamed out to 13mm. The spacer ring between the followers had no grooves and was within the 2mm width (not less than 1.92mm max wear) and the dia of the ring matched the dia of the cam follower pivot at 13mm (max 13.2mm). the rollers themselves moved smoothly and the play between the rollers and their mounts was within the min of 0.08mm to 0.20mm. Less than 0.08mm play will cause binding and scuffing of the followers on the cam surface. If you have to install new pivots and peened them over the mounts, any rough protruding edges need to be removed to prevent the followers fouling each other as they move back and forth.

I put Dirko on the base of the pushrod cover tube and a paper gasket and tightened up the two base studs. I inserted the two pushrods, jiggling them a bit to make sure the ball ends sunk into the rocker cups. I then slid the cam followers onto the pivot shaft.

The timing gear spacer slides onto the crankshaft with the larger dia head butting up against the timing side main bearing followed by the timing gear. The gear is held in place with a key which should be a tight fit both in the crankshaft groove and in the timing gear groove. There should be no lateral play in the gear after the nut is tightened up.

Valve Timing


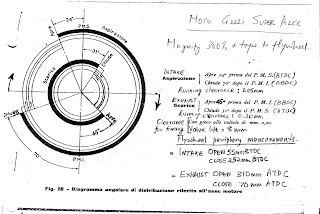
First move the piston to TDC (arrow on flywheel points to arrow on crankcase) on its compression stroke (puff of air out of the plug hole!) . Inset the cam so that the roller followers on the pushrods are on the flat of the cam. Now adjust the rocker arms so that the play is 0.20mm for both intake and exhaust valves (this is NOT the running clearance). I then mounted a dial indicator onto the cylinder head (held in place with its own magnet) and rested the tip on the inlet valve head. Since the engine rotates backwards, move the flywheel anti-clockwise 55mm. I used a sharp point to scribe a mark on the flywheel periphery at this 55mm mark (this is 55mm to the R of the TDC arrow). The intake valve should start to open at this point (you should start to see movement on the dial indicator). If it does not, return the piston to TDC, remove the cam and reposition. Some cam gears have punch marks that align with the crankshaft timing gear punch marks (and the magneto gear punch marks) but, of course, my machine had not such marks. Incidentally, one tooth on the cam gear = 10 deg of crank movement = 23mm on my flywheel rim. If you still cannot get it right, rotate the pinion gear on the crankshaft by one keyway position. One of the three keyways inside the pinion gear will work. I marked the two meshing teeth with white-out for later reference or for that mechanic not born yet who will be working on this bike long after I have chugged off to the Great Twisty Road in the sky.

Final adjustment of the valves is done on a cold motor and is set to 0.05mm for intake and 0.30mm for exhaust. After 5 or so engine runs (with a complete cool-down after each run) recheck the clearances and the head bolts.

The timing diagram on the right shows the various intake (aspirazione) and exhaust (scarico) open (apre) and close (chiude) points both in degrees and measured along the flywheel periphery. NOTE: THE EXHAUST TIMING HAS BEEN CORRECTED IN THIS DIAGRAM FROM THE DRAWING (FIG 28) IN THE SUPERALCE MANUAL WHICH SHOWS THE EXHAUST OPENING 72DEGREES BBDC.

The head was then tightened down with around 28 ft.lbs of torque with a fresh new head gasket from Stucchi.

Thursday, March 4, 2010

Cylinder Head & Valves


My cylinder head turned out to be a lot of work. First, the original hairpin valve springs had been replaced by more modern double coil springs. Apparently, this was a common modification. Not being able to locate any hairpin springs in a reasonable amount of time and wanting to retain some traces of everyday, practical modifications that owners made, I kept the coil springs. Since these were non-standard, I do not have any specifications for them nor do I know their origin. Table 1 above from the manual shows the specs for the standard hairpin springs.

Valve Guides

I did not need to do it but the manual says that if you need to replace the intake valve guide punch the guide out from the inside (there is a retainer step on the outside); presumably, heating the head will make this easier. For the exhaust valve guide, the manual warns that the end inside the combustion chamber can get deformed making punching from the inside out difficult. The recommended process is to chisel off the retainer step on the outside and then punch it into the combustion chamber. A new intake guide needs to be reamed with a 10mm reamer while the exhaust needs a 11mm reamer. Though I did not need to do it for my coil springs, the original hairpin springs when compressed to 16.5mm, must be able to hold a weight of 21kg to 23kg. If they hold less than 20kg replace the springs. Finally, check the edge of the upper plate where it supports the spring - if heavily grooved, replace it.


One thing to note in the drawing in Table 1 is the oil passage drilled into the inlet valve (B) guide (E). This is an approximately 3mm dia hole that aligns with a corresponding hole in the cylinder head and allows oil to lubricate the inlet valve stem. The head and valve guide did not have the hole drilled (for whatever reason) and so with a 2mm drill bit I drilled down carefully at an angle, making sure my drill bit did not break off. Sure enough it did, but luckily there was enough sticking out for me to extract it and restart. Once I had the 2mm hole, I used a 3mm bit to get it to the right size. A little bit of fiddling with a small file to deburr the intake valve guide and I was done. The photo above shows the hole leading to the inlet valve and the waisted stud that holds the rocker box. The narrow waist of the stud allows oil mist to travel past it to the hole and then into the valve guide. This setup allows intake suction to pull oil from the rocker chamber, along the intake rocker surface, and up into the intake valve guide area. It then blows out to lubricate the exhaust guide. It's a dead loss system. But you won't get any rocker or valve lubrication without it. The rocker boxes rest on the spacers, one of which is shown next to the narrow stud.


Valves

My valves were within the specs shown on the Table. With the head upside down on my bench, I poured some acetone into the combustion chamber with the valves resting on their seats without their springs. I left the acetone for a while to see if there was any leakage. None after a half hour or so which meant that the valve mating surfaces were fine - no need for lapping. If I had to, starting with coarse Clover compound and then finishing with fine would do the trick.
he brass bushes that the rockers run in have a number of oil passage grooves that someone has carved.One thing missing from my engine and the photo below are the caps that fit on to the valve stems on which the rocker tips act. Mine were missing and I could not locate a pair anywhere. I doubt there is going to be serious wear of the valve tips given my usage. If I find some, I will retrofit it.

Rockers
I was running my finger along the rocker shaft (the part that lies in the bush) and felt a small ridge that seems to correspond with the oil groove in the bush. This must have happened as the rocker bushes must have been too tight or the machine not used for a while. According to jerry Kimberlin, that is just the way the rockers wear, common on all older machines. Probably the rocker shafts were oval to some extent too. Jerry' s solution is to put the rockers in his lathe and grind them with the tool post grinder until they are round. That might take more grinding than you have bushing so you have to be really careful how much is taken off. With new bushings it might be possible to skim 0.20 mm and still be able to bore the bushes to fit. But a little too much and both the rockers and the bushes are useless! Filing down the ridges is a no-no. I ran a smooth oilstone around them till I could not feel much of a ridge but stopped fairly quickly as I did not want it to get out of round or remove too much from the rockers. I replaced the cups that the pushrod ballends act on. The tips that act on the valves were in good condition as were the locking threads.

Rocker Bushes


The rocker bushes were a different story - they had clearly seen better days and. They were clearly mismatched and had a number of gashes in the bearing surface. I got a new set from Stucchi. The picture shows the oil grooves and the threaded hole which is used to retain the bottom half to the rocker box. There is an oil groove that intersects this hole with one end of the groove running all the way to the end of the bush and other end of the groove stopping a few mm before the radial groove. They are installed so that the end where the groove extends all the way to the end of the bush is closest to the pushrod tube. There is a bevel at each end of the bearing ID also. This allows the vacuum to suck oil from the pushrod tube into the intake rocker guide. The exhaust rocker guide is lubricated by drip from the intake guide area. If those grooves went clear out to the felt seal and washer, it would break the vacuum effect and result in a poorly lubricated intake rocker. The inlet rocker bush has a hole that aligns with the lubrication hole in the intake valve guide and the hole in the rocker box and the bush obviously need to align.

The rocker bushes are clamped between the halves of the rocker box. The bottom half of the bearing is attached with a bolt, the top half just sits there and is held by the edges of the rocker. This results in no float of the rocker. The diameter of the bearings is supposed to fit the rocker box without any space. If it is all nice and tight, you don't have to worry about any misalignment since any misalignment is taken care of by the ball and socket on the pushrod and the valve adjuster on the rocker arm.

Rocker Boxes

The rocker boxes needed a lot of work. First, I had to remachine the oil seal grooves - these had closed up. The ends of the boxes also had modern oil seals - fine for keeping oil in if in good condition but they were not! So, with my Dremel I carefully opened up the half moon grooves in each half of the boxes to the width of the endplates that I got from Stucchi.

Next, I had to get the felt oil seals from Stucchi - the ATHENA felt kits which are labeled for SuperAlce are too thick and can't be inserted. The ATHENA kits labeled for Sport-14 fit nicely but the kit seems to have only one rocker felt and so you need two of these kits and you cannot use the remaining Sport-14 seals. You can, of course, make your own if you have the right dimensions. I needed new rocker bushes and these again came from Stucchi. The rocker bushes are retained by bolts that thread into them.


Rocker Box Mounts

Once I bolted the boxes together I found that I need three mounts for the rocker box to rest - there was a motley collection of nuts and washers that supported the box in the unrestored bike. Patrick Hayes had his head open at that time and so the dimensions came back for the three rocker box mounts - the inlet having different dimensions from the other two. This larger spacer also has a flat side so it is shaped like a "D". This flat side goes up against the rubber accordion seal at the top of the push rod tube. If you used a fully round spacer, it would crush and distort this seal. The drawing above shows the specs.

The last thing to check was the threads, rocker shafts, rocker adjusters, and rocker tips. These seemed to be in good condition and nothing needed to be done. I bolted the two halves of the rocker box together and then mounted it on the head and that was that!

Broken fins: One of the fins on the head had broken off and I wanted to try my hand at fixing it. I cut out a piece of thin cast iron from some scrap at the local dump and beveled one edge of the broken fin and the other edge of the shaped piece of scrap. I held the piece in place with a magnet tilting it down slightly. The reason for tilting is that as a cast iron weld cools it shrinks and, in this case, would pull the added piece up at an incorrect angle to the rest of the fin. I tack welded the corners, removed the magnet and then filled in the bevel. Luckily, my estimated angle of tilt worked out fine as it came level to the old fin when cool. A run with the grinder over the weld brought it to a smooth finish. Viola!

Now, onto mounting the head, the pushrods and valve timing.